Garmin Edge 810 Bike Computer
25th Jul 2013
Hot on the heels of my review of the Garmin Fenix GPS watch comes this review of the 810 cycle computer.
Whilst reviewing the watch it quickly became evident that whilst it was up to the job of recording a cycle route it wasn’t well suited to providing much in the way of en-route feedback, and had very limited mapping capabilities, something which is pretty useful given the mileages it’s possible to accomplish quickly on a bike.
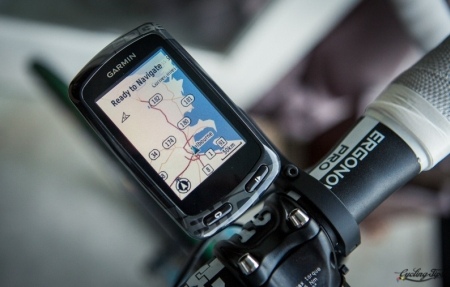
The solution? A dedicated handle-bar mounted cycle computer. Effectively this is a miniature GPS unit, with a far superior battery life to those found in cars, combined with most of the functionality of the Fenix watch. It’s screen is big enough to be able to see the colour maps (the whole of the UK is included on a 4gb Micro SD card with the packaged unit, though it is possible to purchase additional maps if you are going further afield). With a limited set of buttons on the unit – a power button top left, and two function / selection buttons on the front, you’d be forgiven for thinking that this could be a bit of a pig to handle. However it has a touch screen than operates when wet and with gloved hands which makes it a whole lot more usable. Most operation is carried out by a reasonably intuitive combination of button and touch-screen input. The screen is bright enough to see in all but the brightest of days, but could in truth be a little sharper. I’ll give Garmin the benefit of the doubt and assume that the reason it’s not as high res as your average smart phone is to save on battery, finding a practical compromise between the two important functions. We can assume though, that the next iteration of the thing will have a better defined screen.
OK, so what does the thing do?
First and foremost it does what the Fenix does, and most other GPS devices do – it tracks your route when out and about on a bike, providing you with a log of where you have been, distance covered, elevation gained and lost, speed, heart rate (if you’re using the supplied monitor), cadence (if you have the supplied device fitted to your bike), and calories burned. What it also does, is show you where you are at any given time, on an OS map, provide you with the ability to upload a pre-mapped route, and to follow it as you would do a regular Satnav, setting yourself a virtual pacer if you choose. It also has Bluetooth connectivity allowing you to pair it with your mobile phone whilst riding, which means that others can then follow your progress via Garmin Connect. It also automatically uploads new activities (if connected via Bluetooth) to Garmin Connect where you can keep tabs on what you have been up to.
And how does it perform?
Before you set off.
When you first start the device it asks you to enter your height, weight, bike type etc, and creates Bike Profile. You can do this not only for different bikes, but also for different riders if you share the device (I do with my wife), naming each Profile differently. A very handy feature in my book. The device comes with a cadence metre and a physical speed gauge which you fit to one of your bikes (additional sets can be purchased for additional bikes but it’s not a quick operation to switch from one to another. In case you’re wondering why you’d bother fitting a speed sensor when the device already measures your speed, it’s a lot more reliable at any given moment than relying on GPS signals which may be obscured by trees or clouds. In order to pair the cadence metre with the device you need to delve into the actual Bike Profile you want to pair it with.
If you are uploading a route to the device from your computer I’ve learned that it’s best to create the route from scratch in Garmin Connect and upload from there rather than treating the thing like a mass storage device and simply dragging and dropping files. It can be a little laborious recreating a route in Garmin Connect, but it’s definitely worth the extra minute spent doing. One small bug that took me a while to figure out is that the unit doesn’t support long file names. I had two routes that I’d created and tried to upload them both. They had longish names of about thirty characters, the first 20 or so of which were the same. The unit kept overwriting one with the next as I tried to upload them, but I couldn’t tell which one as I could only read the first ten or so characters. Keeping the names short meant I could identify which was which without having to delve into the details and also allowed both to be uploaded.
On the Road
Turning the device on takes about 15 seconds, and locking on to the GPS satellites takes another 15. Pretty good times when you compare to other devices. First thing to do before you actually set off is to select your profile. This is a simple swipe left or right action. Start your activity simply by pressing the bottom right hand button. Same button finishes the activity. If you forget to press the start button when you set off the unit handily pops a message on screen saying that it has detected movement and asks whether you would like to start the activity. A great little feature! .
Once you are off the main screen shows you your elapsed time, speed, distance travelled, time of day, and calories. If you are simply logging a ride then you can switch between the following different screens: Speed, Distance and Average Speed, An ascent and descent profile with total ascent and current elevation, a virtual pacer which tells you how far ahead of or behind your default pace (that you can set up when setting up a profile) you are, along with a little graphic (you can adjust the pace easily enough on this screen with a + and a – button), and a map showing where you are (the device comes pre-loaded with OS maps for the UK and Northern Ireland, but you can purchase others separately). In the same way that you can set up Bike Profiles you can also set Activity Profiles which allow you to display pretty much any combination of data in whichever order you like. Selecting the profile is as easy as selecting your Bike Profile (and is easily forgotten!).
The other feature you can use, as already mentioned, is its navigation software. I’ve already described my issues with the filename length. I’ve had one or two smooth rides with the navigator, and one or two less than smooth. Once the device simply crashed on me and reset itself. On a couple of occasions it has directed me on minor roads where I would not have expected to go – in one case a very steep gravel track on my road bike. In all of these cases it’s been actually down to human error, or should I say a combination of lack of checking by me, and overzealous short-cut finding by the mapping software that I have used to create the routes! The moral of the story is that it’s well worth taking the time to plot a proper route on your computer rather than get half way through a ride and have to work out where you are and where you are going when it presents you with a footpath that the computer thought was a road! When operating smoothly it’s fantastic. You can use your regular information screens showing distance, time etc, but as soon as you come within range of a junction (this range seems to vary depending on the speed you’re travelling and the nature of the junction, sometimes giving you a mile of warning, sometimes only a quarter of a mile. As soon as you enter this range the map automatically pops up with an instruction telling you which way you will be turning at the approaching junction, and how far away it is, much the same as a regular satnav. My only word of warning here is that it doesn’t always know which roads have priority at junctions, so sometime misses a turn when it thinks that the road you should have been on had priority, but didn’t, and sometimes tells you to turn off when you shouldn’t for the opposite reason. It soon becomes obvious though, and a message comes up telling you that you are off course. You can pre-empt these mistakes by every now and then swiping on to your map screen to check out the route ahead to see which way you SHOULD be going before you actually get to a junction.
When you get back.
One point I would make to the designers. When you press the button to finish you get a screen asking you if you want to Save or Discard your activity. Remember it is a touch screen? Well you are prompted with these two choices by way of two equally sized buttons on the screen itself. So far I have not inadvertently pressed Discard, but I can see that it will be easy to do at the end of a tough run, perhaps if the screen is wet from rain. It’d be a simple software change to make the Discard button smaller than the Save one. Not sure if it would be possible to retrieve the data if Discarded, but could be a bit disastrous.
Personally I use Strava to keep tabs, but I am sure plenty of folk use Garmin Connect. Fortunately Garmin and Strava like each other so it’s a simple matter to upload stuff from the unit directly to Strava when you plug in the USB cable. Well I say it’s a simple job, but this is one of the few areas where the unit has not lived up to expectation, sometimes taking 5 minutes of faffing to actually be recognised by the computer. 90% of the time it’s fine, but on occasion it throws a wobbly which is frustrating. The important thing is that I have not lost any data.
The Bluetooth is potentially a handy feature, but I would have preferred to see an Ant+ option whereby I can plug in a dongle to the PC and don’t then have to connect the unit up when I get in (I’ve had some frustrating issues with connecting it up by cable on a coupe of occasions where it’s taken five minutes of plugging and unplugging cables, resetting the device etc in order for the PC to recognise the thing. Of course if you use Garmin Connect and pair with our smartphone then this isn’t an issue as the route is automatically uploaded, but I don’t and its frustrating that there isn’t a wireless alternative.
Summary
A pretty amazing bit of gadgetry that makes riding a whole lot more fun, and recording your rides a whole lot more reliable (apart from the one crash, and the couple of connectivity issues it’s worked like a dream, with the battery never really approaching the half way mark on rides of up to 5 hours). It could do with a higher definition screen, but we can live with this one. Not sure Garmin have made the right call making it pair with smartphones instead of computers (why not both?) wirelessly, but then again for years I avoided getting myself a mobile phone thinking they were a passing fad! Very impressed over all.